CodeByAkram

How to push data to solace queue using JMS?

 In this blog, lets check how we can push the data to solace mq or solace queue using JMS. Message queues are the endpoints which guarantees you the delivery of a message without fail.

So to implement the Java code to push messages, first add the below dependency in pom.xml file if you are using the maven project in case.

<dependency>

<groupId>com.solacesystems</groupId>

<artifactId>sol-jms</artifactId>

<version>10.10.0</version>

</dependency>

 You can find the latest version of sol-jms from  Solace Queue Maven

Below is the sample program to push the message to Solace Queue by using JMS. Please enter your queue connection details.

package com.services.impl;

import java.util.Properties;
import javax.jms.Connection;
import javax.jms.ConnectionFactory;
import javax.jms.DeliveryMode;
import javax.jms.JMSException;
import javax.jms.MessageConsumer;
import javax.jms.MessageProducer;
import javax.jms.Session;
import javax.jms.TextMessage;
import javax.naming.Context;
import javax.naming.InitialContext;
import javax.naming.NamingException;
import org.apache.log4j.Logger;
import com.solacesystems.jms.SolQueue;
import com.solacesystems.jms.SolTopic;
import com.solacesystems.jms.SupportedProperty;

public class PushData {

	private final static Logger logger = Logger.getLogger(PushData.class);

	public String pushDataToSolaceQueue(String requestText) {
		TextMessage textMessageToSend = null;
		String response = null;
		Session session = null;
		MessageProducer queueSender = null;
		MessageConsumer queueReceiver = null;

		Connection connection = null;
		String messageID;
		Properties env = new Properties();
		env.put(InitialContext.INITIAL_CONTEXT_FACTORY, "com.solacesystems.jndi.SolJNDIInitialContextFactory");
		env.put(InitialContext.PROVIDER_URL, "enter providerURL");
		env.put(Context.SECURITY_PRINCIPAL, "enter userName");
		env.put(Context.SECURITY_CREDENTIALS, "Enter password");

		env.put(SupportedProperty.SOLACE_JMS_VPN, "Enter VPN Name");

		env.put(SupportedProperty.SOLACE_JMS_JNDI_CONNECT_TIMEOUT, 60000);
		// InitialContext is used to lookup the JMS administered objects.
		InitialContext initialContext;
		try {
			initialContext = new InitialContext(env);

			// Lookup ConnectionFactory.
			ConnectionFactory cf = (ConnectionFactory) initialContext.lookup("Enter Connection Factory");

			// JMS Connection
			connection = cf.createConnection();
			// Create a session
			// Create a non-transacted, Auto Ack session.
			session = connection.createSession(false, Session.AUTO_ACKNOWLEDGE);

			textMessageToSend = session.createTextMessage("");
			textMessageToSend.setText(requestText);
			textMessageToSend.setJMSType("mcd://xmlns");
			textMessageToSend.setJMSDeliveryMode(DeliveryMode.PERSISTENT);
			// textMessageToSend.setJMSReplyTo((Destination) responseQueue);
			Object torQ = initialContext.lookup("request topic here");
			if (torQ instanceof SolTopic) {
				logger.info("assigning the request to a SolTopic");
				SolTopic requestTopic = (SolTopic) torQ;
				queueSender = session.createProducer(requestTopic);
				logger.info("sending message");
				queueSender.send(requestTopic, textMessageToSend);

			} else {
				logger.info("assigning the request to a SolQueue");
				SolQueue requestTopic = (SolQueue) torQ;
				queueSender = session.createProducer(requestTopic);
				logger.info("sending message");
				queueSender.send(requestTopic, textMessageToSend);
			}
			logger.info("pushDataToSolaceQueue() : message sent to queue is " + textMessageToSend.getText());
			// remember the messageID
			messageID = textMessageToSend.getJMSMessageID();
			logger.info("MessageID is " + messageID);
			connection.start();
			response = messageID;

			return response;

		} catch (JMSException jmsException) {
			logger.error("JMSException occurred due to " + jmsException.getLinkedException(), jmsException);

		} catch (NamingException jmsException) {
			logger.error("NamingException occurred  due to " + jmsException.getMessage(), jmsException);

		} catch (Exception exception) {
			logger.error("Unhandeled exception occurred  due to " + exception.getMessage(), exception);

		} finally {
			if (queueReceiver != null) {
				try {
					queueReceiver.close();
				} catch (Exception e) {
					logger.error("Exception in closing the Queue Receiver: " + e.getMessage());
				}
			}
			if (queueSender != null) {
				try {
					queueSender.close();
				} catch (Exception e) {
					logger.error("Exception in closing the Queue Sender: " + e.getMessage());
				}
			}
			if (session != null) {
				try {
					session.close();
				} catch (Exception e) {
					logger.error("Exception in closing the Queue Session: " + e.getMessage());
				}
			}
			if (connection != null) {
				try {
					connection.stop();
				} catch (Exception e) {
					logger.error("Exception in stopping the Queue Connection: " + e.getMessage());
				}
				try {
					connection.close();
				} catch (Exception e) {
					logger.error("Exception in closing the Queue Connection: " + e.getMessage());
				}
			}
		}
		return response;
	}

}

How to use / implement OWASP ESAPI Logger in Java

Before going further lets talk about Log Forging or JVM Log Forging. 

Log Forging

According to OWASP , writing invalidated logs can allow attackers to forge log or inject malicious content in log file. Log forging is when attackers tries to add/modify the log content by exploring the security loopholes of application.

Lets understand the log forging by an example.


private void printLog(String amount) {
logger.info("Amount credited in account Rs. {}" + amount);
}
above code will print the logs like:

Amount credited in account Rs. 500

 Now suppose attacker provide the input \n\n Amount debited in account Rs.500

Amount credited in account Rs. 500

Amount debited in account Rs.500

So, attacker forged the logs by making a fake or forge entry in log.


Avoid directly embedding user input in log files when possible. Sanitize untrusted data used to construct log entries by using safe logging mechanism such as OWASP ESAPI logger, which will automatically remove unexpected carriage returns. So, to prevent this, we use use ESAPI Logger mechanism.

Here is the dependency of ESAPI: 

<dependency>

<groupId>org.owasp.esapi</groupId>

<artifactId>esapi</artifactId>

<version>2.2.2.0</version>

</dependency>

We can encode the logs using ESAPI‘s Encoder method and interface:


    public String encode(String message) {
    message = message.replace( '\n' ,  '_' ).replace( '\r' , '_' )
      .replace( '\t' , '_' );
    message = ESAPI.encoder().encodeForHTML( message );
    return message;
}
How to use / implement OWASP ESAPI Logger in Java


Multi threading using Executor Services in Java

 The ExecutorService interface, executes tasks in parallel in background and represents an asynchronous execution mechanism. The ExecutorService create and maintain the reusable thread pool.


How to create ExecutorService?

To create ExecutorService, you can use Executors factory to create the instance of ExecutorService. Lets see some examples.


 There are diffrent way to execute or submit the task with ExecutorService.
  1. submit(Runnable)
  2. submit(Callable)
  3. execute(Runnable)
  4. invokeAny(...)
  5. invokeAll(...)
Lets go through with the example to run multiple treads with ExecutorService.

import java.util.concurrent.ExecutorService;
import java.util.concurrent.Executors;

public class HTMLUnitMultipleThreads {

	public static void main(String[] args) {

		int threadSize = 5;
		ExecutorService executor = Executors.newFixedThreadPool(threadSize);
		for (int i = 0; i < threadSize; i++) {
			executor.submit(new MultiThreadingService());
		}
	}
}

public class MultiThreadingService implements Runnable {

	@Override
	public void run() {
		for (int i = 0; i < 10; i++) {
			System.out.println("Thread Name = " + Thread.currentThread().getName());
		}

	}

}

Getting Started with Angular

We have setup the development setup of angular in angular-installation blog. Now in this blog, lets start a new project and lets see how we can create a new project in Angular.

How we can create a new project in Angular?

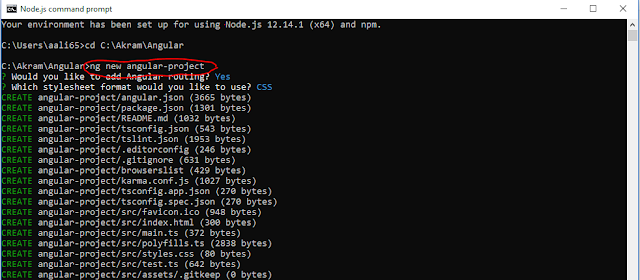
To create a new project, open Angular CLI and type below mentioned command and press enter. This will take some time to create an ready to build application for you.


ng new angular-project

To create a new project, open Angular CLI and type below mentioned command and press enter. This will take some time to create an ready to build application for you.


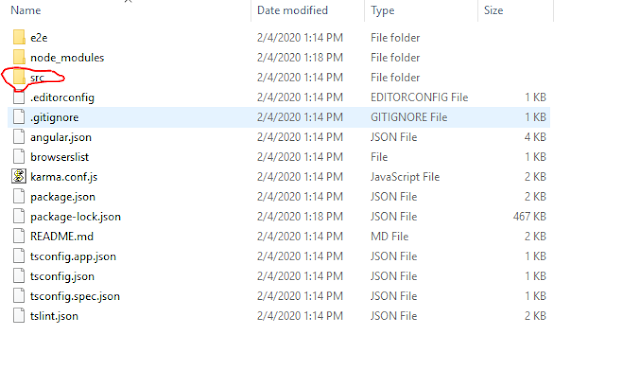
Now this will create a full ready to build angular application. In below image you can see the full folder structure of angular application.

full folder structure of angular application
We'll be mainly working in the src folder.

Run or Serve application

You can build and run the application by using below CLI command. The default port for angular application is 4200.

Go to angular-project folder and then run the application.

cd angular-project
ng serve
build and run the application by using below CLI command


We can open this application on our browser at http://localhost:4200/

We can open this application on our browser at http://localhost:4200/


So this application is working fine. If you are facing some problem while running your application , let me know in comments section.

Angular Installation

Lets talk about the installation process of Angular, which tools and IDE is required for angular,

How to install Angular?

Which IDE is used for angular?

Before getting started with Angular you have to download IDE like Visual Studio Code, Eclipse, Atom etc.

We will be using Visual Studio Code in our tutorial.

Visual Studio Code is open source and it is light weight, easy to use. It has vast range of built-in code formatting, editing and refactoring features.

You can download Visual Studio Code from: https://code.visualstudio.com

Install Node.js

You should install node.js to run the angular application, node.js provides npm dependencies and required libraries.

You can download and install node.js from: https://nodejs.org/en/

After node.js installation you will see the below command prompt.

You should install node.js to run the angular application, node.js provides npm dependencies and required libraries

Angular CLI

Angular app is mainly developed and run by the CLI, that helps in creating new project, adding files and other task.

To install Angular globally run below command or go to Angular official site https://cli.angular.io/ 

1. Run npm install -g @angular/cli on Node.js command prompt. This command will globally install angular on your system.
CodeByAkram - Run npm install -g @angular/cli on Node.js command prompt

2. Now you need to create a new angular app/project by using this command ng new my-dream-app
CodeByAkram - command ng new my-dream-app

3. Go to project directory using cd my-dream-app command and hit ng serve command to run the angular application.
CodeByAkram - hit cd my-dream-app command and hit ng serve command to run the angular application.

4. Now open http://localhost:4200/ in browser and will see angular app running in browser.
CodeByAkram - will see angular app running in browser.