2019 - CodeByAkram

Write a program to print first non repeated char in a string in Java.


Write a program to print first non repeated char in a string in Java.

We are using the HashMap to store the character as key and count of times it is repeated as value.


package com.string.codebyakram;

import java.util.HashMap;

public class NonReapingCahr {
 public static void main(String[] args) {
  String string = "hello";
  System.out.println(findNonReapingCahr(string));
 }

 public static char findNonReapingCahr(String string) {

  HashMap< character > countChar = new HashMap<>();

  for (int i = 0; i < string.length(); i++) {
   int count = countChar.get(string.charAt(i)) == null ? 1 : countChar.get(string.charAt(i)) + 1;
   countChar.put(string.charAt(i), count);
  }

  for (int i = 0; i < string.length(); i++) {
   if (countChar.get(string.charAt(i)) == 1) {
    return string.charAt(i);
   }
  }
  return '\0';

 }
}

How to create multiple log file using same log4j property file?

You can create multiple logs file by using same log4j properties file or you can send logs to multiple files by using same log4j file.

How to create multiple log file using same log4j property file?
Add this below to your log4j properties file.

log4j.rootLogger=TRACE, stdout
log4j.appender.dataLogs=org.apache.log4j.FileAppender
log4j.appender.dataLogs.File=logs/logFile1.log
log4j.appender.dataLogs.layout=org.apache.log4j.PatternLayout
log4j.appender.dataLogs.layout.ConversionPattern=%d [%24F:%t:%L] - %m%n
log4j.appender.reportsLog=org.apache.log4j.FileAppender
log4j.appender.reportsLog.File=logs/logFile2.log
log4j.appender.reportsLog.layout=org.apache.log4j.PatternLayout
log4j.appender.reportsLog.layout.ConversionPattern=%d [%24F:%t:%L] - %m%n

log4j.category.dataLogger=TRACE, dataLogs
log4j.additivity.debugLogger=false
log4j.category.reportsLogger=DEBUG, reportsLog
log4j.additivity.reportsLogger=false
Then configure the loggers in the code accordingly as shown below:

static final Logger debugLog = Logger.getLogger("dataLogger");
static final Logger resultLog = Logger.getLogger("reportsLogger");

How to delete log4j/log file older than N number of days?

How to delete log4j/log file by N number of days?

package com.avaya.deletelogs;

import java.io.File;
import java.io.FilenameFilter;
import java.util.Arrays;
import java.util.List;

public class DeleteLogs {

 private String baseDir = "/opt/java/IVRLog";
 private int daysBack = 4;

 public void invokeProcess() {
  getFolders();
 }

 public void getFolders() {

  try {
   File file = new File(baseDir);
   String[] directories = file.list(new FilenameFilter() {

    public boolean accept(File current, String name) {
     return new File(current, name).isDirectory();
    }
   });
   deleteFiles(daysBack, baseDir, Arrays.asList(directories));
  } catch (Exception e) {
   System.out.println(e);
  }
 }

 public void deleteFiles(int daysBack, String dirWay, List< string> directories) {
  for (String dir : directories) {
   deleteFilesOlderThanNdays(daysBack, dir);
  }

 }

 public void deleteFilesOlderThanNdays(int daysBack, String dirWay) {

  File directory = new File(baseDir + "/" + dirWay);
  if (directory.exists()) {

   File[] listFiles = directory.listFiles();
   long purgeTime = System.currentTimeMillis() - (daysBack * 24 * 60 * 60 * 1000);
   for (File listFile : listFiles) {
    try {
     if (listFile.isFile()) {
      if (listFile.lastModified() < purgeTime) {
       if (!listFile.delete()) {
        System.err.println("Unable to delete file: " + listFile);
       }
      }
     } else {
      continue;
     }
    } catch (Exception e) {
     System.out.println(e);
    }
   }
  }
 }

}

What do you mean by Aspect, Join Point, Advice?


What’s the difference between @Component, @Controller, @Repository & @Service annotations in Spring?

What do you mean by Aspect, Join Point, Advice?

Pointcut: Pointcut are expressions that is matched with join points to determine whether advice needs to be executed or not. Pointcut uses different kinds of expressions that are matched with the join points and Spring framework uses the AspectJ pointcut expression language.
AOP Advice Types
Before Advice: These advices run before the execution of join point methods. Use @Before annotation to mark an advice type as Before advice.
After (finally) Advice: An advice that gets executed after the join point method finishes executing, whether normally or by throwing an exception. We can create after advice using @After annotation.
After Returning Advice: Sometimes we want advice methods to execute only if the join point method executes normally. We can use @AfterReturning annotation to mark a method as after returning advice.
After Throwing Advice: This advice gets executed only when join point method throws exception, we can use it to rollback the transaction declaratively. We use @AfterThrowing annotation for this type of advice.
Around Advice: This is the most important and powerful advice. This advice surrounds the join point method and we can also choose whether to execute the join point method or not. We can write advice code that gets executed before and after the execution of the join point method. It is the responsibility of around advice to invoke the join point method and return values if the method is returning something. We use @Around annotation to create around advice methods.

What’s the difference between @Component, @Controller, @Repository & @Service annotations in Spring?


Spring Annotations, Codebyakram


Spring 2.5 introduces further stereotype annotations: @Component@Service, and @Controller@Component is a generic stereotype for any Spring-managed component. @Repository@Service, and @Controller are specializations of @Component for more specific use cases, for example, in the persistence, service, and presentation layers, respectively.

You may also like What do you mean by Aspect, Join Point, Advice?

Therefore, you can annotate your component classes with @Component, but by annotating them with @Repository@Service, or @Controller instead, your classes are more properly suited for processing by tools or associating with aspects. For example, these stereotype annotations make ideal targets for pointcuts.

Thus, if you are choosing between using @Component or @Service for your service layer, @Service is clearly the better choice. Similarly, as stated above, @Repository is already supported as a marker for automatic exception translation in your persistence layer.


Differentiate between constructor injection and setter injection

Partial Dependency

In Setter Injection, partial dependency is possible, means if we have 4 dependencies as mentioned below,

Differentiate between constructor injection and setter injection, codebyakram


Then it is not necessary to inject all values if we are using setter injection.

But in Constructor Injection, partial dependency is not possible because we are calling the constructor of that class.

Overriding

Constructor Injection can not override the setter injected properties but Setter injection can override the constructor injected properties.

Changes

Setter injection makes bean class object as mutable but constructor injection makes bean class object as immutable. 

Number of dependencies

If we have dependencies for example 17 in our bean class then, in this case setter injection is not recommended as we need to write almost 17 setters right, bean length will increase.

In this case, Constructor injection is highly recommended, as we can inject all the dependencies with in 3 to 4 lines by calling one constructor.


Java 8 Lambda Comparator

Lets se how we can sort the object by using java 8 lambda comparator. For this let take a Employee class.

Java 8 Lambda Comparator, codebyakram

public class Employee {
    private String name;
    private int salary;
 
    // standard constructors, getters/setters, equals and hashcode
}

1. Classic sort (without lambda)

Comparator< Employee > bySalary = new Comparator< Employee >() {
  @Override
  public int compare(Employee o1, Employee o2) {
   return o1.getSalary().compareTo(o2.getSalary());
  }
 };
2. Lambda expression equivalent.

 Comparator< Employee > bySalary = 
  (Employee o1, Employee o2)->o1.getSalary().compareTo(o2.getSalary());

You may also like to read What do you mean by Aspect, Join Point, Advice?

How to get keys and values from Map in Java?

As we know, map is based on key-value pair associations, so interviewer can ask you this question if you are a beginner or having less than 3 years of experience.

So lets see how we can the key and values from a Map?

How to get keys and values from Map, codebyakram


In Java we have and Map.Entry method that returns a collection-view of map.


Map< string string=""> map = new HashMap<>();

 // Get keys and values
 for (Map.Entry< string string=""> entry : map.entrySet()) {
  String k = entry.getKey();
  String v = entry.getValue();
  System.out.println("Key: " + k + ", Value: " + v);
 }

 // In Java 8 we can use for each
 map.forEach((k, v) -> {
  System.out.println("Key: " + k + ", Value: " + v);
 });

How to set connection timeout for RestTemplate in spring?

How to set connection timeout for RestTemplate in spring? codebyakram

We can set the timeout for RestTemplate by doing some custom configuration for RestTemplate.

First you need to create a class named as HttpClientConfig in this class we configure HttpClient because RestTemplate internally uses the HttpClient.


package com.codebyakram;

import org.apache.http.client.config.RequestConfig;
import org.apache.http.impl.client.CloseableHttpClient;
import org.apache.http.impl.client.HttpClients;
import org.slf4j.Logger;
import org.springframework.beans.factory.annotation.Value;
import org.springframework.context.annotation.Bean;
import org.springframework.context.annotation.Configuration;

@Configuration
public class HttpClientConfig {

 public static final Logger LOGGER = org.slf4j.LoggerFactory.getLogger(HttpClientConfig.class.getName());
 // Determines the timeout in milliseconds until a connection is established.
 private static final int CONNECT_TIMEOUT = 30000;

 // The timeout when requesting a connection from the connection manager.
 
 private int REQUEST_TIMEOUT = 10000;
 
 @Bean
 public CloseableHttpClient httpClient() {
  RequestConfig requestConfig = RequestConfig.custom().setConnectionRequestTimeout(REQUEST_TIMEOUT).build();
  return HttpClients.custom().setDefaultRequestConfig(requestConfig).build();
 }
}

Here in this class we setting HttpClient in RestTemplate

package com.codebyakram;

import org.apache.http.impl.client.CloseableHttpClient;
import org.springframework.beans.factory.annotation.Autowired;
import org.springframework.context.annotation.Bean;
import org.springframework.context.annotation.Configuration;
import org.springframework.http.client.HttpComponentsClientHttpRequestFactory;
import org.springframework.scheduling.TaskScheduler;
import org.springframework.scheduling.concurrent.ThreadPoolTaskScheduler;
import org.springframework.web.client.RestTemplate;

@Configuration
public class RestTemplateConfig {

 @Autowired
 CloseableHttpClient httpClient;


 @Bean
 public RestTemplate restTemplate() {
  RestTemplate restTemplate = new RestTemplate(clientHttpRequestFactory());
  return restTemplate;
 }

 @Bean
 public HttpComponentsClientHttpRequestFactory clientHttpRequestFactory() {
  HttpComponentsClientHttpRequestFactory clientHttpRequestFactory = new HttpComponentsClientHttpRequestFactory();
  clientHttpRequestFactory.setHttpClient(httpClient);
  return clientHttpRequestFactory;
 }

 @Bean
 public TaskScheduler taskScheduler() {
  ThreadPoolTaskScheduler scheduler = new ThreadPoolTaskScheduler();
  scheduler.setThreadNamePrefix("poolScheduler");
  scheduler.setPoolSize(50);
  return scheduler;
 }
}

So now we are done with the cofiguration of request timeout for RestTemplate.

How to Sort a Stack using Merge Sort?

Interviewer may ask you this question if you have more than 3 years of experience in java development. So lets have a look, how to sort a stack using merge sort?

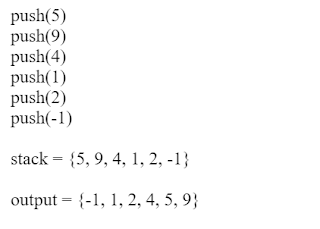
Lets see sample input and output for better understanding:

How to Sort a Stack using Merge Sort? codebyakram


Algorithm
For this we will follow these below two steps,
1. Break the stack into two parts by using two temporary stack.

2. When only one element remains on a Stack, Merge it.

Lets have a look on the program,


package com.codebyakram;
 
import java.util.Stack;
 
public class SortStack {
 
    public static void main(String args[]) {
        Stack stack = new Stack();
        stack.push(5);
        stack.push(9);
        stack.push(4);
        stack.push(1);
        stack.push(2);
        stack.push(-1);

 
        sort(stack);
 
        System.out.println(stack);
    }
 
    private static void sort(Stack stack) {
        Stack s1 = new Stack();
        Stack s2 = new Stack();
 
        while (stack.size() != 0) {
            if (stack.size() % 2 == 0) {
                s1.push(stack.pop());
            } else {
                s2.push(stack.pop());
            }
        }
 
        if (s1.size() > 1) {
            sort(s1);
        }
 
        if (s2.size() > 1) {
            sort(s2);
        }
 
        merge(s1, s2, stack);
    }
 
    private static void merge(Stack s1, Stack s2, Stack stack) {
        Stack mergedStack = new Stack();
        while (!s1.isEmpty() && !s2.isEmpty()) {
            if ((Integer) s1.peek() < (Integer) s2.peek()) {
                mergedStack.push(s2.pop());
            } else {
                mergedStack.push(s1.pop());
            }
        }
 
        while (!s1.isEmpty()) {
            mergedStack.push(s1.pop());
        }
 
        while (!s2.isEmpty()) {
            mergedStack.push(s2.pop());
        }
 
        while (!mergedStack.isEmpty()) {
            stack.push(mergedStack.pop());
        }
    }
}

Adjacency List in Java

An adjacency list represents a graph as an array of linked list.

The index of the array represents a vertex and each element in its linked list represents the other vertices that form an edge with the vertex.

Adjacency List representation
A graph and its equivalent adjacency list representation is shown below.

Adjacency List in Java, codebyakram
An adjacency list is efficient in terms of storage because we only need to store the values for the edges. For a sparse graph with millions of vertices and edges, this can mean a lot of saved space.

Adjacency List Structure
The simplest adjacency list needs a node data structure to store a vertex and a graph data structure to organize the nodes.


We stay close to the basic definition of graph - a collection of vertices and edges {V, E}. For simplicity we use an unlabeled graph as opposed to a labeled one i.e. the vertexes are identified by their indices 0,1,2,3.

Let's dig into the data structures.

struct node
{
    int vertex;
    struct node* next;
};
struct Graph
{
    int numVertices;
    struct node** adjLists;
};

Don't let the struct node** adjLists overwhelm you.

All we are saying is we want to store a pointer to struct node*. This is because we don't know how many vertices the graph will have and so we cannot create an array of Linked Lists at compile time.

Adjacency List Java
We use Java Collections to store the Array of Linked Lists.

class Graph
{
    private int numVertices;
    private LinkedList adjLists[];
}

The type of LinkedList is determined what data you want to store in it. For a labeled graph, you could store a dictionary instead of an Integer

Adjacency List code Java

import java.io.*;
import java.util.*;
class Graph
{
    private int numVertices;
    private LinkedList adjLists[];
 
    Graph(int vertices)
    {
        numVertices = vertices;
        adjLists = new LinkedList[vertices];
        
        for (int i = 0; i < vertices; i++)
            adjLists[i] = new LinkedList();
    }
 
    void addEdge(int src, int dest)
    {
        adjLists[src].add(dest);
    }
 
    public static void main(String args[])
    {
        Graph g = new Graph(4);
 
         g.addEdge(0, 1);
         g.addEdge(0, 2);
         g.addEdge(1, 2);
         g.addEdge(2, 3);
    }
}

Breadth first search in Java

Traversal meaning visiting all the nodes of a graph. Breadth first Search is also known as Breadth first traversal and is a recursive algorithm for searching all the nodes of a graph or tree data structure.

BFS algorithm
A standard BFS algorithm implementation puts each nodes of the graph or tree into one of two categories:
Visited and
Not Visited

The purpose of the algorithm is to mark each node as visited while avoiding cycles.

The algorithm works as follows:

  1. Start by putting any one of the graph's node at the back of a queue or array.
  2. Take the front node of the queue and add it to the visited list.
  3. Create a list of that node's adjacent nodes. Add the ones which aren't in the visited list to the back of the queue.
  4. Keep repeating steps 2 and 3 until the queue is empty.

The graph might have two different disconnected parts so to make sure that we cover every node, we can also run the BFS algorithm on every node

BFS example
Let's see how the BFS algorithm works with an example. We use an undirected graph with 5 nodes.

BFS, codebyakram

We start from node 0, the BFS algorithm starts by putting it in the Visited list and putting all its adjacent nodes in the queue.


Next, we visit the element at the front of queue i.e. 1 and go to its adjacent nodes. Since 0 has already been visited, we visit 2 instead.
BFS, codebyakram

Node 2 has an unvisited adjacent node in 4, so we add that to the back of the queue and visit 3, which is at the front of the queue.

BFS, codebyakram

BFS, codebyakram


Only 4 remains in the queue since the only adjacent node of 3 i.e. 0 is already visited. We visit it.

BFS, codebyakram

Since the queue is empty, we have completed the Depth First Traversal of the graph.

BFS pseudocode


create a queue Q 
mark v as visited and put v into Q 
while Q is non-empty 
    remove the head u of Q 
    mark and enqueue all (unvisited) neighbours of u

BFS Java code

import java.io.*;
import java.util.*;
 
class Graph
{
    private int numVertices;
    private LinkedList adjLists[];
    private boolean visited[];
 
    Graph(int v)
    {
        numVertices = v;
        visited = new boolean[numVertices];
        adjLists = new LinkedList[numVertices];
        for (int i=0; i i = adjLists[currVertex].listIterator();
            while (i.hasNext())
            {
                int adjVertex = i.next();
                if (!visited[adjVertex])
                {
                    visited[adjVertex] = true;
                    queue.add(adjVertex);
                }
            }
        }
    }
 
    public static void main(String args[])
    {
        Graph g = new Graph(4);
 
        g.addEdge(0, 1);
        g.addEdge(0, 2);
        g.addEdge(1, 2);
        g.addEdge(2, 0);
        g.addEdge(2, 3);
        g.addEdge(3, 3);
 
        System.out.println("Following is Breadth First Traversal "+
                           "(starting from vertex 2)");
 
        g.BFS(2);
    }
}

DFS algorithm in Java

Traversal meaning visiting all the nodes of a given graph. Depth first Search is also know as Depth first traversal. DFS is a recursive algorithm for searching all the vertices of a graph or tree.

DFS algorithm
A standard DFS implementation puts each vertex of the graph into one of two categories:

1.Visited
2. Not Visited

The purpose of the algorithm is to mark each vertex as visited while avoiding cycles.

The DFS algorithm works as follows:


  1. Start by putting any one of the graph's vertices on top of a stack.
  2. Take the top item of the stack and add it to the visited list.
  3. Create a list of that vertex's adjacent nodes. Add the ones which aren't in the visited list to the top of stack.
  4. Keep repeating steps 2 and 3 until the stack is empty.

DFS example
Let's see how the Depth First Search algorithm works with an example. We use an undirected graph with 5 vertices.

DFS, codebyakram

We start from node 0, the DFS algorithm starts by putting it in the Visited list and putting all its adjacent nodes in the stack.

DFS, codebyakram

Next, we visit the element at the top of stack i.e. 1 and go to its adjacent nodes. Since 0 has already been visited, we visit 2 instead.

DFS, codebyakram
Node 2 has an unvisited adjacent node in 4, so we add that to the top of the stack and visit it.

DFS, codebyakram


DFS, codebyakram

After we visit the last element 3, it doesn't have any unvisited adjacent nodes, so we have completed the Depth First Traversal of the graph.

DFS, codebyakram


DFS pseudocode (recursive implementation)
The pseudocode for Depth first Search is shown below. In the init() function, notice that we run the DFS function on every node. This is because the graph might have two different disconnected parts so to make sure that we cover every vertex, we can also run the DFS algorithm on every node.


DFS(G, u)
    u.visited = true
    for each v ∈ G.Adj[u]
        if v.visited == false
            DFS(G,v)
     
init() {
    For each u ∈ G
        u.visited = false
     For each u ∈ G
       DFS(G, u)
}

DFS Java code

import java.io.*;
import java.util.*;
 
class Graph
{
    private int numVertices;
    private LinkedList adjLists[];
    private boolean visited[];
 
    Graph(int vertices)
    {
        numVertices = vertices;
        adjLists = new LinkedList[vertices];
        visited = new boolean[vertices];
        
        for (int i = 0; i < vertices; i++)
            adjLists[i] = new LinkedList();
    }
 
    void addEdge(int src, int dest)
    {
        adjLists[src].add(dest);
    }
 
    void DFS(int vertex)
    {
        visited[vertex] = true;
        System.out.print(vertex + " ");
 
        Iterator ite = adjLists[vertex].listIterator();
        while (ite.hasNext())
        {
            int adj = ite.next();
            if (!visited[adj])
                DFS(adj);
        }
    }
 
 
    public static void main(String args[])
    {
        Graph g = new Graph(4);
 
         g.addEdge(0, 1);
         g.addEdge(0, 2);
         g.addEdge(1, 2);
         g.addEdge(2, 3);
 
        System.out.println("Following is Depth First Traversal");
 
        g.DFS(2);
    }
}

Heap Sort in Java

Before looking into Heap Sort, let's understand what is Heap and how it helps in sorting.
What is Complete Binary Tree?
A Complete binary tree is a binary tree in which every node other than the leaves has two children. In complete binary tree at every level, except possibly the last, is completely filled, and all nodes are as far left as possible.

Let's understand with simple words now,
If a Binary Tree is filled level by level, left to right (Left child followed by Right child.) then it is called complete binary tree.

If Right child is present without Left child then it is not complete.
Heap Sort, codebyakram
What is Heap property in Binary Tree?

 A binary Tree is said to follow a heap property if tree is complete binary tree and every element of the tree is Larger (or Smaller) than any of its descendants if they exists.

Depending on the ordering, a heap is called a max-heap or a min-heap.
In a Max-heap, the keys of parent nodes are always greater than or  equal to those of the children.
In max-heap, Largest element of the Tree is always at top(Root Node).

In a Min-heap, the keys of parent nodes are less than or equal to those of the children.
In min-heap, Smallest element of the Tree is always at top(Root Node).

Heap Sort, codebyakram
Important aspects of Heap sort. (Prerequisites)
Before going into Heapsort algorithm, Let's understand few points,

If we have an array say [4, 10, 3, 5, 1], then we can represent array as complete binary tree
(start adding nodes from left to right) like shown below.

Heap Sort, codebyakram

Each element has left and right child present in array except for leaf nodes, but how to find left and right child of non-leaf nodes in array.
We will get left and right child of non leaf elements using formula,
Left child index   = 2 * (index of root, whose left and right child to find) + 1
Right child index = 2 * (index of root, whose left and right child to find) + 1
Left child and Right child of element at index 0 (element 4) is,
Left child index  = 2 * i + 1   = 2 * 0 + 1   = 1
Right child index = 2 * i + 2   = 2 * 0 + 2   = 2

Left child and Right child of element at index 1 (element 10) is,
Left child index  = 2 * i + 1   = 2 * 1 + 1   = 3
Right child index = 2 * i + 2   = 2 * 1 + 2   = 4

Left child and Right child of element at index 2 (element 3) is,
Left child index  = 2 * i + 1   = 2 * 2 + 1   = 5
(index 5 is greater than length of array, so element 3 has no left child)

Right child index = 2 * i + 2   = 2 * 2 + 2   = 6
(index 6 is greater than length of array, so element 3 has no right child)

Algorithm
STEP 1:  Logically, think the given array as Complete Binary Tree,

STEP 2:  For sorting the array in ascending order, check whether the tree is satisfying Max-heap
               property at each node,
               (For descending order, Check whether the tree is satisfying Min-heap property)
               Here we will be sorting in Ascending order,

STEP 3: If the tree is satisfying Max-heap property, then largest item is stored at the root of the heap.
               (At this point we have found the largest element in array, Now if we place this element at
               the end(nth position) of the array then 1 item in array is at proper place.)
               We will remove the largest element from the heap and put at its proper place(nth position) in
               array.
 
              After removing the largest element, which element will take its place? 
              We will put last element of the heap at the vacant place. After placing the last element at the
              root, The new tree formed may or may not satisfy max-heap property.
              So, If it is not satisfying max-heap property then first task is to make changes to the tree, So
              that it satisfies max-heap property.
         
              (Heapify process: The process of making changes to tree so that it satisfies max-heap
               property is called heapify)

              When tree satisfies max-heap property, again largest item is stored at the root of the heap. 
              We will remove the largest element from the heap and put at its proper place(n-1 position) in
              array.
 
              Repeat step 3 until size of array is 1 (At this point all elements are sorted.)

Heapify Process with Example
Heapify process checks whether item at parent nodes has larger value than its left and right child.

If parent node is not largest compared to its left and right child, then it finds the largest item among parent, its left and right child and replaces largest with parent node.

It repeat the process for each node and at one point tree will start satisfying max-heap property.
At this point, stop heapify process and largest element will be at root node.

We found the largest element, Remove it and put it at its proper place in array,
Put the last element of the tree at the place we removed the node(that is at root of the tree)
Placing last node at the root may disturbed the max-heap property of root node.
So again repeat the Heapify process for root node. Continue heapify process until all nodes in tree satisfy max-heap property.


Initially, From which node we will start heapify process? Do we need to check each and every node that they satisfy heap property?
We do not have to look into leaf nodes as they don't have children and already satisfying max-heap property.
So, we will start looking from the node which has at least one child present.

How we will get that item in array, which has at least one child present?
By using the formula (array.length/2) - 1, we will be able to get the index of the item to start Heapify process. 
Heap Sort, codebyakram 

Lets understand Heapify process with help of an example.

Heap Sort, codebyakram

Heap Sort, codebyakram

Heap Sort, codebyakram

Heap Sort, codebyakram


Heap Sort Java Program.

package com.codebyakram.sort;
 
public class HeapSort {
 
    public static void main(String[] args) {
        int[] array = new int[] {4, 10, 3, 5, 1};
 
        new HeapSort().sort(array);
 
        for (int i : array) {
            System.out.print(i + " ");
        }
    }
 
    public void sort(int data[]) {
        int size = data.length;
 
        /*
            {4, 10, 3, 5, 1}
 
                  4
                /  \
               10  3
              / \
             5  1
         */
        //This step is called building a Heap
        for (int i = size / 2 - 1; i >= 0; i--) {
            heapify(i, data, size);
        }
 
        //Once the heap is build by above step, we replace the max element at arr[0](root element) to last index of array
        //and decrease the size by 1 in next iteration as highest element is already at its place.
        for (int i = data.length - 1; i >= 0; i--) {
 
            //Swap max element at root(arr[0] to last element)
            int temp = data[0];
            data[0] = data[i];
            data[i] = temp;
 
            //reduce the heap window by 1
            size = size - 1;
 
            //swapping would have disturbed the heap property,
            //so calling max heapify for index 0 on the reduced heap size.
            //if we pass i in place of size should also work as that also represents the size
            heapify(0, data, size);
        }
    }
 
    private int leftChild(int i) {
        return 2 * i + 1;
    }
 
    private int rightChild(int i) {
        return 2 * i + 2;
    }
 
    private void heapify(int i, int[] data, int size) {
        int largestElementIndex = i;
 
        int leftChildIndex = leftChild(i);
        if (leftChildIndex < size && data[leftChildIndex] > data[largestElementIndex]) {
            largestElementIndex = leftChildIndex;
        }
 
        int rightChildIndex = rightChild(i);
        if (rightChildIndex < size && data[rightChildIndex] > data[largestElementIndex]) {
            largestElementIndex = rightChildIndex;
        }
 
        if (largestElementIndex != i) {
            int swap = data[i];
            data[i] = data[largestElementIndex];
            data[largestElementIndex] = swap;
 
            // Recursively heapify for the affected node
            heapify(largestElementIndex, data, size);
        }
    }
}

Summarize Heap Sort algorithm.
1. We build a heap(Max or Min) from the given array elements.
2. The root is the max (or min number). So extract it and put it in an array at its proper position.
3. Put last element at the root of the tree and Heapify the remaining elements.
4. Again extract the root and repeat heapification until there is one element in array.

Advantage of using Heap Sort algorithm for Sorting
1. Heap sort has the best possible worst case running time complexity of O(n Log n).
2. It doesn't need any extra storage and that makes it good for situations where array size is large.

Merge sort in Java

Related questions: Sort Linked List using Merge Sort, Given a Linked list, Sort it using Merge Sort Algorithm.

Merge sort is preferred algorithm for sorting a linked list, lets see why,
The way linked list is structured which doesn't allow random access makes some other algorithms like Quicksort perform poorly, So Merge sort is often preferred algorithm for sorting linked list.

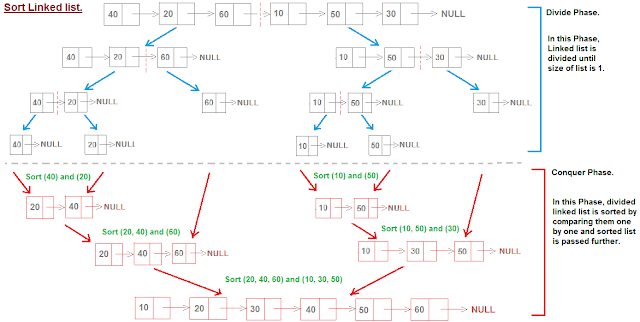
Lets understand what is the input and the expected output.
Algorithm (We will use Merge Sort for sorting Linked list.)
For sorting Linked list, we can use any algorithm but the most suitable algorithm is Merge Sort.

Why is merge sort preferred over quick sort for sorting linked lists?

As Singly Linked list can be accessed in only one direction and cannot be accessed randomly, Quick sort will not be well suitable here.

Quick sort requires access to elements in both direction for swapping and doing such operation in Linked list is not as easy as working with Arrays.
Starting from the end and moving backward is usually expensive operation in Singly linked list.
So Quick sort is well suited for arrays and not linked list.

Merge sort is a divide and conquer algorithm in which need of Random access to elements is less.
So Merge Sort can be used for sorting Linked list.


How Merge Sort works

  1. Merge Sort works by breaking the linked list(or Array) into 2 equal parts say Left half and Right half.
  2. Again break 2 list that we got in Step 1 in two equal parts each.  
  3. Repeat above steps until only 1 element remains in Linked list (or Array) because list with only 1 element is always sorted. 
  4. So in each step we are breaking the list in Left half and Right half.  
  5. When complete list is divided and contains only Single element in Left and Right half each, Start comparing and sorting each Left and Right half, So that portion of Linked list will be sorted.
  6. Repeat Step 5 for all the remaining Left and Right half and complete linked list will be sorted.
It works on divide and conquer technique. Time complexity is O(N log N).
Lets understand with the help of below example.
 
Sorting Linked list using Merge sort in Java. (Recursive Approach)


package linkedlist.singly;
 
public class SortLinkedList {
 
 Node startNode;
  
 public static void main(String[] args) {
  new SortLinkedList();
 }
 
 public SortLinkedList() {
  Node node1 = new Node(10);
  Node node2 = new Node(1);
  Node node3 = new Node(-2);
  Node node4 = new Node(8);
  Node node5 = new Node(9);
  Node node6 = new Node(10);
  Node node7 = new Node(1);
 
  node1.setNext(node2);
  node2.setNext(node3);
  node3.setNext(node4);
  node4.setNext(node5);
  node5.setNext(node6);
  node6.setNext(node7);
 
  startNode = node1;
   
  Node sortedStartNode = mergeSortLinkList(startNode);
  printLinkList(sortedStartNode);
 }
 
 private Node mergeSortLinkList(Node startNode){
   
  //Break the list until list is null or only 1 element is present in List.
  if(startNode==null || startNode.getNext()==null){
   return startNode;
  }
 
  //Break the linklist into 2 list.
  //Finding Middle node and then breaking the Linled list in 2 parts.
  //Now 2 list are, 1st list from start to middle and 2nd list from middle+1 to last.
   
  Node middle = getMiddle(startNode);
  Node nextOfMiddle = middle.getNext();
  middle.setNext(null);
 
  //Again breaking the List until there is only 1 element in each list.
  Node left = mergeSortLinkList(startNode);
  Node right = mergeSortLinkList(nextOfMiddle);
 
  //Once complete list is divided and contains only single element, 
  //Start merging left and right half by sorting them and passing Sorted list further. 
  Node sortedList = mergeTwoListRecursive(left, right);
   
  return sortedList;
 }
 
 //Recursive Approach for Merging Two Sorted List
 private Node mergeTwoListRecursive(Node leftStart, Node rightStart){
  if(leftStart==null)
   return rightStart;
   
  if(rightStart==null)
   return leftStart;
 
  Node temp=null;
   
  if(leftStart.getData() < rightStart.getData()){
   temp=leftStart;
   temp.setNext(mergeTwoListRecursive(leftStart.getNext(), rightStart));
  }else{
   temp=rightStart;
   temp.setNext(mergeTwoListRecursive(leftStart, rightStart.getNext()));
  }
  return temp;
 }
 
 private Node getMiddle(Node startNode) {
  if(startNode==null){
   return startNode;
  }
 
  Node pointer1=startNode;
  Node pointer2=startNode;
   
  while(pointer2!=null && pointer2.getNext()!=null && pointer2.getNext().getNext()!=null){
   pointer1 = pointer1.getNext();
   pointer2 = pointer2.getNext().getNext();
 
  }
  return pointer1;
 }
 
 private void printLinkList(Node startNode) {
  Node temp = startNode;
  while(temp!=null){
   System.out.print(temp.getData() + " ");
   temp = temp.getNext();
  }
 }
  
}
Sorting Linked list using Merge sort in Java. (Iterative Approach)

package linkedlist.singly;
 
public class SortLinkedList {
 
 Node startNode;
 
 public static void main(String[] args) {
  new SortLinkedList();
 }
 
 public SortLinkedList() {
  Node node1 = new Node(10);
  Node node2 = new Node(1);
  Node node3 = new Node(-2);
  Node node4 = new Node(8);
  Node node5 = new Node(9);
  Node node6 = new Node(10);
  Node node7 = new Node(1);
 
  node1.setNext(node2);
  node2.setNext(node3);
  node3.setNext(node4);
  node4.setNext(node5);
  node5.setNext(node6);
  node6.setNext(node7);
 
  startNode = node1;
 
  Node sortedStartNode = mergeSortLinkList(startNode);
  printLinkList(sortedStartNode);
 }
 
 private Node mergeSortLinkList(Node startNode){
 
  //Break the list until list is null or only 1 element is present in List.
  if(startNode==null || startNode.getNext()==null){
   return startNode;
  }
 
  //Break the linklist into 2 list.
  //Finding Middle node and then breaking the Linled list in 2 parts.
  //Now 2 list are, 1st list from start to middle and 2nd list from middle+1 to last.
 
  Node middle = getMiddle(startNode);
  Node nextOfMiddle = middle.getNext();
  middle.setNext(null);
 
  //Again breaking the List until there is only 1 element in each list.
  Node left = mergeSortLinkList(startNode);
  Node right = mergeSortLinkList(nextOfMiddle);
 
  //Once complete list is divided and contains only single element, 
  //Start merging left and right half by sorting them and passing Sorted list further. 
  Node sortedList = mergeTwoListIterative(left, right);
 
  return sortedList;
 }
 
 //Iterative Approach for Merging Two Sorted List
 private Node mergeTwoListIterative(Node leftStart, Node rightStart) {
 
  Node merged=null;
  Node temp=null;
 
  //To keep track of last element, so that we don't need to iterate for adding the element at last of 
  //list when either LeftStart or rightStart is NULL.
  Node lastAddedNode = null;
 
  while(leftStart!=null && rightStart!=null){
 
   if(leftStart.getData()>rightStart.getData()){
    temp = new Node(rightStart.getData());
    rightStart=rightStart.getNext();
 
   }else{
    temp = new Node(leftStart.getData());
    leftStart=leftStart.getNext();
   }
 
   if(merged==null){
    merged=temp;
   }else{
    lastAddedNode.setNext(temp);     
   }
   lastAddedNode=temp;
  }
 
  if(leftStart!=null){
   lastAddedNode.setNext(leftStart);
  }else{
   lastAddedNode.setNext(rightStart);
  }
   
  return merged;
 }
 
 private Node getMiddle(Node startNode) {
  if(startNode==null){
   return startNode;
  }
 
  Node pointer1=startNode;
  Node pointer2=startNode;
 
  while(pointer2!=null && pointer2.getNext()!=null && pointer2.getNext().getNext()!=null){
   pointer1 = pointer1.getNext();
   pointer2 = pointer2.getNext().getNext();
 
  }
  return pointer1;
 }
 
 private void printLinkList(Node startNode) {
  Node temp = startNode;
  while(temp!=null){
   System.out.print(temp.getData() + " ");
   temp = temp.getNext();
  }
 }
 
}

Insertion Sort in Java

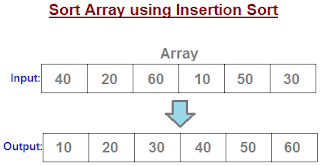
Given a array of integers, Sort it using Insertion sort.
Lets understand what is the input and the expected output.

Example
Assume 5 persons of different heights are visiting at your office each at 5 minutes interval and you need to make them stand according to their heights(smaller to higher). How you will do?

Below is the sequence in which person is going to visit you,

You need to arrange above persons based on their height.
First "A" will visit and that is the only person present, so just tell him to stand and you don't need to take any decision.
Second "B" will visit, so now you have to compare "B" height with "A" height, which is smaller, so shift "A" one step back and move "B" one step ahead.
Now, you have arranged 2 persons properly.
Now "C" entered in office, so you have to find proper position for "C" to stand.
First you will compare "C" height with "A", which is smaller so "A" need to be shifted one step back and "C" need to be shifted one step in front.
Now, compare "C" height with "B", which is higher than "B", So stop here because you have found proper position of "C" to stand.
Now, you have arranged 3 persons properly.
Now "E" entered in office, so you have to find proper position for "E" to stand.
First you will compare "E" height with "D", which is smaller so "D" need to be shifted one step back and "E" need to be shifted one step in front.
Now compare "E" height with "A", which is smaller so "A" need to be shifted one step back and "E" need to be shifted one step in front.
Now compare "E" height with "C", which is smaller so "C" need to be shifted one step back and "E" need to be shifted one step in front.
Now, compare "E" height with "B", which is higher than "B", So stop here because we have found proper position of "E" to stand and all the person ahead of B will be smaller than "B", so no need to check further.
Same logic we will use in Insertion sort.
Algorithm
Insertion Sort is very basic and easy sorting algorithm to understand and implement.
Insertion sort works by shifting and putting element at its correct position in array.
 Lets see how it works:

Insertion sort start's sorting an array by picking 1st element of array.
(We begin by assuming that a array with one item (position 0) is already sorted.)
So now we have one sorted elements set.

Now, we will pick 2nd element of array and compare it with sorted elements set one by one until we find correct position of 2nd element in sorted set.
Elements which are higher than 2nd element are shifted one step back to make space for 2nd element.
After putting 2nd element at its correct position, we have 2 elements in our sorted set.

Now, we will pick 3rd element of array and compare it with sorted elements set one by one until we find correct position of 3rd element in sorted set.
Elements which are higher than 3rd element are shifted one step back to make space for 3rd element.
After putting 3rd element at its correct position, we have 3 elements in our sorted set.

Repeat the process until all elements are sorted. 
Complexity
1. The insertion sort, unlike the other sorts, passes through the array only once. 
2. The insertion sort splits an array into two sub-arrays,
    First sub-array on left side is always sorted and increases in size as the sort continues.
    Second sub-array is unsorted, contains all the elements yet to be inserted into the first sub-array,
    and decreases in size as the sort continues.

3. Insertion sort is efficient for (quite) small data sets.
4. It is more efficient than selection sort or bubble sort.
5. Insertion sort is very efficient for arrays which is nearly(almost) sorted and it sorts nearly sorted
    array in time complexity of O(N).
    (For sorting an array containing elements in descending order to ascending order, insertion sort
    will give poor performance and complexity will be O(N^2))

6. It is Stable sort; i.e., does not change the relative order of elements with equal keys.
7. It is In-place sort; i.e., only requires a constant amount O(1) of additional memory space
8. It can sort elements as it receives it and no need of complete data initially before start sorting.
    (Online).
Java Program for Insertion Sort

package sorting;
 
public class InsertionSort {
 public static void main(String[] args) {
  new InsertionSort();
 }
 
 public InsertionSort() {
  int[] arr=new int[]{1,9,4,10,0};
 
  System.out.println("Before Sorting...");
  printArray(arr);
   
  insertionSort(arr);
   
  System.out.println("\nAfter Sorting...");
  printArray(arr);
 }
 
 private void insertionSort(int arr[]){
  if(arr==null || arr.length<2){
   return;
  }
 
  for (int i = 1; i < arr.length; i++) {
   int temp = arr[i];
    
   // Comparison starts from one step back of element on which we are working that is i.
   int j=i-1; 
    
   //Compare elements till we not found element higher than temp or all element are compared.
   while( j >= 0 && arr[j] > temp){
    arr[j+1] = arr[j];
    j--;
   }
   arr[j+1]=temp;   
  }
 }
 
 private void printArray(int arr[]){
  for (int i = 0; i < arr.length; i++) {
   System.out.print(arr[i] + " ");
  }
 }
  
}

How To deploy Spring Boot application on Tomcat?

How To deploy Spring Boot application on existing Tomcat?

Related Questions:- Deploy a Spring Boot WAR into a Tomcat Server, Spring Boot – Deploy WAR file to Tomcat

spring boot tomcat codybyakram


Spring boot is a framework that allow you to set up production ready setup of spring application and also Tomcat is one of the most popular server used for Java. By default spring boot application build a standalone application that can contains the Tomcat. But if you have your existing Tomcat and you want to deploy your spring boot application on that server than you need to follow the below steps.

Add the below dependency in pom.xml

               <dependency>
<groupId>org.springframework.boot</groupId>
<artifactId>spring-boot-starter-tomcat</artifactId>
<scope>provided</scope>
</dependency>

And change the packaging to war or just add the below code in pon.xml.

             <packaging>war</packaging>

Finally, we initialize the Servlet context required by Tomcat by implementing the SpringBootServletInitializer interface and override the configure method:

@SpringBootApplication
public class Application extends SpringBootServletInitializer {
@Override
protected SpringApplicationBuilder configure(SpringApplicationBuilder application) {
return application.sources(Application.class);

public static void main(String[] args) {
SpringApplication.run(Application.class, args);

}
}

Now build war file using below maven command,
      
      mvn clean package

How to use regular expressions with String methods in Java?


How to use regular expressions with String methods in Java?
regular expressions codebyakram

Strings in Java have built-in support for regular expressions. 
Strings have 4 built-in methods for regular expressions, i.e., the matches()split())replaceFirst() and replaceAll() methods.

Method
Description
s.split("regex")
Creates an array with substrings of s divided at occurrence of "regex""regex" is not included in the result.
s.replaceFirst("regex"), "replacement"
Replaces first occurrence of "regex" with replacement.
s.matches("regex")
Evaluates if "regex" matches s. Returns only true if the WHOLE string can be matched.
s.replaceAll("regex"), "replacement"
Replaces all occurrences of "regex" with replacement.

Now lets see the implementation of regex in Java String.

package com.codebyakram.regex;
public class RegexTest {
    public static final String DATA = "This is my small example "
            + "string which I'm going to " + "use for pattern matching.";

    public static void main(String[] args) {
        System.out.println(DATA.matches("\\w.*"));
        String[] splitString = (DATA.split("\\s+"));
        System.out.println(splitString.length);// should be 14
        for (String string : splitString) {
            System.out.println(string);
        }
        // replace all whitespace with tabs
        System.out.println(DATA.replaceAll("\\s+", "\t"));
    }
}
Examples
  Now let’s see another example for regex in Java.


package com.codebyakram.regex;;

public class StringMatcher {
    // returns true if the string matches exactly "true"
    public boolean isTrue(String s){
        return s.matches("true");
    }
    // returns true if the string matches exactly "true" or "True"
    public boolean isTrueVersion2(String s){
        return s.matches("[tT]rue");
    }

    // returns true if the string matches exactly "true" or "True"
    // or "yes" or "Yes"
    public boolean isTrueOrYes(String s){
        return s.matches("[tT]rue|[yY]es");
    }

    // returns true if the string contains exactly "true"
    public boolean containsTrue(String s){
        return s.matches(".*true.*");
    }


    // returns true if the string contains of three letters
    public boolean isThreeLetters(String s){
        return s.matches("[a-zA-Z]{3}");
        // simpler from for
//      return s.matches("[a-Z][a-Z][a-Z]");
    }


    // returns true if the string does not have a number at the beginning
    public boolean isNoNumberAtBeginning(String s){
        return s.matches("^[^\\d].*");
    }
    // returns true if the string contains a arbitrary number of characters except b
    public boolean isIntersection(String s){
        return s.matches("([\\w&&[^b]])*");
    }
    // returns true if the string contains a number less than 300
    public boolean isLessThenThreeHundred(String s){
        return s.matches("[^0-9]*[12]?[0-9]{1,2}[^0-9]*");
    }

}